


.")


In today’s always-connected world, a strong, stable internet connection is as essential as electricity and running water. From checking emails and streaming shows to working remotely or gaming online, nearly every aspect of our digital lives depends on a seamless connection.
And yet, many people don’t truly understand the equipment that makes it all happen namely, the modem and the router. If you’ve ever peeked behind your TV stand or under your desk, you’ve likely seen a few blinking boxes with cables snaking in and out of them.
You might even refer to all of them as “the Wi-Fi box.” But in reality, those devices are doing very different jobs and understanding their roles can help you solve connectivity issues, make smarter buying decisions, and get the most out of your internet service.
For example, when your internet slows to a crawl or disconnects entirely, knowing whether the modem or the router is at fault can save you hours on hold with tech support. Similarly, if you’re upgrading your network for faster speeds or better coverage, it helps to know which device you actually need to replace.
In a nutshell, the modem is your direct link to the internet it communicates with your Internet Service Provider (ISP) and brings the internet into your home. The router, on the other hand, takes that connection and shares it across multiple devices, often wirelessly.
While they work together closely, they’re not the same thing, and treating them as such can lead to confusion, frustration, and unnecessary expenses. Complicating things further, many ISPs now provide combined modem-router units, blurring the lines even more. But don’t worry you don’t need to be a tech expert to understand how these devices function.
Once you learn the basic differences, you’ll be better equipped to optimize your setup, troubleshoot issues, and make informed choices about your home network. Whether you’re setting up internet for the first time in a new apartment, expanding your Wi-Fi coverage in a large house, or just trying to understand why your Zoom call keeps freezing, this guide will break down the key distinctions between routers and modems in a clear, simple way.
By the end, you’ll know exactly what each device does, why each is important, and how to ensure they’re working together to give you the best online experience possible. So if you’ve ever asked yourself, “What’s the difference between a router and a modem and why should I care?” you’re in the right place.

A router is a vital piece of networking equipment that plays a central role in how you and your devices access the internet. While the modem brings the internet into your home by connecting to your Internet Service Provider (ISP), the router takes that single internet connection and shares it with multiple devices like your smartphone, laptop, smart TV, or gaming console.
Essentially, the router creates a local network, allowing all your devices to communicate not just with the internet, but also with each other. Think of the router as a digital traffic controller. It manages the flow of data to and from your devices, ensuring that each one gets the information it needs without running into others on the network.
Most modern routers also offer Wi-Fi capability, which means you can connect to the internet wirelessly without needing Ethernet cables. This wireless feature is what most people think of as “Wi-Fi,” but in reality, Wi-Fi is just the method your router uses to distribute internet access.
In addition to sharing the connection, routers add a layer of security to your network by assigning local IP addresses and using features like firewalls and encryption. This helps protect your devices from unwanted access or cyber threats. Some advanced routers even allow for parental controls, guest networks, device prioritization, and customizable settings for different levels of control and performance.
Without a router, you’d only be able to plug a single device directly into the modem and there’d be no wireless connection. Whether you’re working from home, gaming online, or streaming your favorite shows, a router ensures all your devices can stay connected simultaneously and efficiently.
In short, the router is what transforms your internet signal into a usable, shareable network across your entire space, giving you the freedom and flexibility to stay online however and wherever you like.
A modem is one of the most essential devices in your internet setup because it acts as the bridge between your home network and your Internet Service Provider (ISP). The term “modem” stands for modulator-demodulator, which describes its primary function: converting digital data from your devices into signals that can travel over your ISP’s infrastructure, and then converting incoming signals back into data your devices can understand.
Without a modem, your internet connection simply wouldn’t exist it’s the gateway that brings the internet into your home or office. Modems connect directly to the ISP through cables like coaxial, DSL (phone line), or fiber optic, depending on the type of internet service you subscribe to.
Once connected, the modem receives the internet signal from your ISP and translates it into a format that can be used by your devices. Most modems have a single Ethernet port, which means they can connect to only one device at a time usually a router, which then distributes the connection to multiple devices. Because of this, a modem on its own is not enough for modern households with many Wi-Fi-enabled gadgets.
Another important aspect of modems is that they handle authentication with your ISP, ensuring you have authorized access to the internet service you pay for. They also manage the speed and quality of the signal coming into your home, making the modem’s quality and compatibility critical for a reliable and fast internet connection.
In short, the modem is the essential device that translates and connects your home network to the vast world of the internet. It’s the first step in getting online, and without it, your router and other devices would have no access to the outside world.
Whether you’re streaming videos, checking emails, or joining a video call, the modem is silently working behind the scenes to make sure your digital life stays connected.
| Feature | Modem | Router |
|---|---|---|
| Purpose | Connects to ISP | Distributes connection to devices |
| Connectivity | One device | Multiple devices |
| Wi-Fi | No | Yes (in most cases) |
| Security | Minimal | Offers firewall & encryption |
| Local Network | No | Yes |
Knowing the difference between a modem and a router can help you:
Some ISPs provide a modem-router combo a single device that does both jobs. These can be convenient and space-saving, but they may lack the advanced features or performance that standalone routers provide.

To build a reliable and fast internet setup, it’s crucial to understand the roles of both your modem and router. The modem gets you online, and the router keeps your home connected. Whether you’re streaming, gaming, or just browsing, having the right equipment and knowing how it works makes a big difference.

In today’s increasingly connected world, our homes have become digital ecosystems. From smartphones and laptops to smart TVs, voice assistants, and security cameras, countless devices rely on your Wi-Fi to function. But while the convenience of a connected home is undeniable, it also opens the door to new vulnerabilities ones that can be exploited if your network isn’t properly secured.
Every time you stream a movie, check your bank account, or control your thermostat remotely, data is being transmitted through your home router. That router acts as the gateway between your personal life and the wider internet, yet many people plug it in and forget about it. Unlike your phone or computer, routers don’t nag you for updates or scream for attention when something’s wrong.
That silence can be dangerous. Hackers don’t need physical access to your home to steal your data or invade your privacy; they only need to exploit a weak network configuration. Surprisingly, some of the most common vulnerabilities stem from factory-default settings, outdated firmware, and weak Wi-Fi passwords issues that are easy to fix if you know where to look.
Unfortunately, most people don’t take the time to check. Maybe it feels too technical. Maybe it sounds like it’ll take too long. Or maybe it just hasn’t crossed your mind at all. But here’s the truth: you don’t need to be a tech expert or spend hours digging through settings to secure your home network.
In fact, with just 10 minutes and a few simple steps, you can dramatically reduce your exposure to online threats. Think of it like locking your front door not because you expect a break-in, but because it’s the smart thing to do.
A secure home starts with a secure network, and your router is the cornerstone of that network. Whether you’re working from home, managing smart home devices, or just browsing casually, it’s crucial that your data remains protected. Cybercriminals constantly scan for weak links, and home routers are among their favorite targets.
A single compromised device can lead to stolen credentials, hijacked bandwidth, or even full control of your network. But don’t worry this blog is not about fear; it’s about empowerment. With this quick router checkup, you’ll learn how to take control of your digital perimeter.
We’ll walk you through the key settings, show you what to look for, and help you apply fixes in minutes not hours. No jargon, no tech degree required. So if you’ve been wondering whether your home network is really secure or haven’t thought about it at all now is the perfect time to act. Grab a cup of coffee, log in to your router, and let’s get started. You’re only ten minutes away from a safer, smarter, more secure home network.

Start by accessing your router’s admin panel. Open a web browser and type your router’s IP address usually something like 192.168.1.1 or 192.168.0.1.
Tip: You’ll find the exact IP address and login credentials on the back or bottom of your router.
Once logged in, change the default admin username and password if you haven’t already. Default logins are a hacker’s best friend.
Router manufacturers release firmware updates to patch security holes and improve performance.
Bonus: Some newer routers can auto-update. Enable this if available.
Avoid using personal information (like your last name or address) in your Wi-Fi network name. It should be unique but not identifiable.
Under your wireless settings:
Create a long, unique password. A mix of letters, numbers, and symbols is best.
Most routers have a “Device List” that shows what’s connected to your network.

A quick router checkup doesn’t take much time, but it can dramatically boost your home network’s security. You don’t need to be a cybersecurity expert just a little proactive.
Your router is the front door to your digital life. Make sure it’s locked.

When you spin up a server in the cloud, it feels like you’re provisioning a real, physical machine somewhere a dedicated box in a modern data center, humming quietly, just for your workloads. You choose the operating system, the instance size, the region, and moments later, it’s ready: a public IP address, terminal access, full root control.
You might refer to it as “your server”, and from a developer’s perspective, it behaves exactly like one. But here’s the thing most people don’t realize: what you’re actually getting isn’t a physical server at all it’s a virtual machine (VM). Your “cloud server” is just one slice of a much larger machine, abstracted and provisioned for you by a cloud provider through the magic of virtualization.
This is the essence of Infrastructure as a Service (IaaS): compute resources delivered on demand, highly flexible, scalable, and abstracted away from the underlying hardware. The experience is intentionally seamless, designed to mimic traditional servers, but under the hood, things are very different.
What you’re interacting with is a fully virtualized instance, managed by a hypervisor that runs multiple virtual machines on shared physical hardware. It’s this model that enables much of what makes cloud computing so powerful elasticity, pay-as-you-go pricing, fast provisioning, and high availability. But it also introduces complexity and trade-offs, especially when it comes to performance, isolation, and architecture.
In this blog, we’ll explore what IaaS really is, how virtual machines power your cloud experience, and why understanding the difference between a physical server and a VM matters more than you think.
We’ll demystify what’s happening behind that friendly cloud console, shed light on the shared infrastructure you’re building on, and help you make smarter, more informed decisions about scaling, cost optimization, and system design. Because in the world of modern cloud, knowing what’s real and what’s virtual can be the key to getting the most out of your infrastructure.

Infrastructure as a Service (IaaS) is a category of cloud computing that provides virtualized computing resources over the internet. Think of it as renting compute power, storage, and networking without owning any of the physical hardware.
Popular IaaS providers include:
With IaaS, you don’t manage physical servers or data centers. Instead, you provision virtual machines on-demand, typically through a web dashboard or API.
When cloud platforms offer a “server,” it’s a convenient abstraction. Behind the scenes, you’re actually getting a virtual machine a software-based emulation of a physical computer. This VM runs on a hypervisor, which sits on a real physical host and can run multiple VMs in parallel.
So, that Ubuntu box you deployed on AWS EC2? It’s a guest OS running inside a virtual environment, on top of a hypervisor like KVM or Xen, which is itself running on a shared piece of hardware with (probably) many other customers’ VMs.
Why does this matter? Because it explains some of the behavior you see in the cloud:
This virtualization layer is what makes cloud IaaS so flexible but also why it’s not the same as having a physical dedicated server.
IaaS makes heavy use of virtualization because it enables:
Scalability: VMs can be spun up or destroyed on-demand, automatically, and quickly.
Cost Efficiency: Providers can maximize hardware usage by packing multiple VMs onto the same physical server.
Isolation: VMs are isolated from each other, so one customer’s workload doesn’t directly affect another’s (at least in theory).
Flexibility: Developers can choose their OS, install custom software, and manage the VM like they would a traditional server.
For most users, the VM/server distinction doesn’t change day-to-day usage. But it becomes important when:
If you need guaranteed, isolated performance, that’s where offerings like dedicated hosts, bare metal servers, or hybrid cloud come in.
Next time you click “Launch Instance,” remember: you’re not booting up a real, standalone machine just for you. You’re deploying a virtual machine in a shared data center, managed by your cloud provider, built for flexibility and scale.
And that’s exactly what makes IaaS so powerful.
Understanding what’s really happening under the hood can help you make smarter decisions whether you’re optimizing cloud costs, designing scalable architectures, or diving deeper into DevOps and infrastructure automation.
So, the next time someone says “cloud server,” you’ll know they really mean VM in disguise.

So, the next time you deploy a “server” in the cloud, remember: you’re not powering on a physical box reserved just for you you’re launching a virtual machine, one of many running on shared infrastructure managed by your cloud provider.
This virtualization is the backbone of IaaS, and it’s what enables the speed, flexibility, and scalability we now take for granted in modern cloud environments.
While the term “server” still holds meaning in how we talk and think about infrastructure, understanding the virtual nature of what you’re really working with can give you a deeper appreciation for how the cloud works and help you design smarter, more efficient systems.
In the end, knowing that your cloud “server” is really a VM isn’t just a technicality it’s a key insight that shapes how you build, scale, and succeed in the cloud.
In today’s DevOps-driven world, infrastructure is no longer a static resource it’s dynamic, automated, version-controlled, and tightly integrated into every phase of the software delivery lifecycle. The technologies that enable this transformation must be just as flexible and responsive.
Two of the most critical infrastructure tools in this space are Virtual Machines (VMs) and containers. Both have reshaped how developers build, test, and deploy applications, but they are often misunderstood, misused, or wrongly seen as interchangeable.
While they share similarities in concept encapsulating workloads, improving portability, and reducing configuration drift they differ dramatically in architecture, performance, and ideal use cases.
The surge in cloud computing and DevOps practices has fueled widespread adoption of containers, with platforms like Docker and Kubernetes enabling lightning-fast deployments and microservice architectures. In contrast, virtual machines seen by some as a legacy solution have quietly maintained their dominance as the backbone of cloud infrastructure, powering services like AWS EC2, Azure VMs, and Google Compute Engine.
Despite the popularity of containers, VMs haven’t faded into irrelevance. In fact, they’ve evolved in parallel, offering even greater performance, compatibility, and management capabilities than in the past. For most organizations, it’s not a matter of choosing one over the other, but learning how and when to use each effectively.
The mistake many engineers make is assuming that containers are always a superior replacement for VMs. This oversimplification often leads to performance issues, security gaps, and architectural inefficiencies. The truth is, VMs and containers are fundamentally different tools, each with its own strengths and trade-offs.
VMs offer full isolation and the ability to run different operating systems on the same hardware, making them perfect for legacy applications, compliance-heavy environments, and long-running workloads. Containers, on the other hand, are ideal for ephemeral workloads, microservices, CI/CD pipelines, and rapid application scaling. Knowing how they work, where they excel, and how to combine them is essential knowledge for any DevOps engineer.
Moreover, as organizations move toward hybrid and multi-cloud environments, understanding both technologies becomes critical. Kubernetes clusters often run on VM-based nodes. CI/CD pipelines may use VMs for isolated test environments but rely on containers for actual application deployment.
Infrastructure as Code (IaC) tools like Terraform and Packer treat VMs and containers as first-class citizens. DevSecOps practices extend security policies to both. In short, the modern DevOps toolchain is built on the coexistence of VMs and containers, not the replacement of one by the other.
This blog will walk through the core differences between virtual machines and containers, their respective strengths and limitations, and offer practical guidance on how to choose the right tool for the job based on real-world use cases.
Whether you’re running legacy systems on-premises, deploying stateless apps in the cloud, or building out a hybrid infrastructure that spans multiple providers, understanding the nuances of these two technologies will empower you to make smarter, more scalable infrastructure decisions.
By the end, you’ll not only see why both VMs and containers still matter, but also how they can be used together to create efficient, secure, and flexible DevOps pipelines. This is not about declaring a winner it’s about equipping yourself with the right knowledge to architect resilient systems in a world where infrastructure is code, automation is expected, and adaptability is key.
A Virtual Machine is a full emulation of a physical computer. It includes its own operating system, virtualized hardware (CPU, memory, disk, network), and behaves like a standalone server. VMs run on a hypervisor, which manages multiple VMs on a single physical machine.
VMs are ideal for workloads that require a full operating system, advanced system-level configurations, or strong security boundaries. They’re also the go-to choice in hybrid cloud, multi-cloud, and regulated environments where compliance and compatibility are critical.
A container is a lightweight, portable environment that packages an application and its dependencies, running atop the host OS kernel. Instead of virtualizing hardware, containers virtualize the operating system, making them much more resource-efficient.
Containers are the backbone of modern DevOps practices especially in CI/CD, serverless, and Kubernetes-based environments. They enable rapid development, testing, and deployment cycles with high portability and scalability.
| Feature | Virtual Machines (VMs) | Containers |
|---|---|---|
| Isolation | Full OS-level (strong) | Process-level (lightweight) |
| OS per instance | Yes | No (shares host kernel) |
| Boot time | Minutes | Seconds or milliseconds |
| Resource usage | Heavy | Lightweight |
| Compatibility | Any OS | Same OS family as host |
| Use case fit | Legacy, secure, complex systems | Microservices, ephemeral workloads |
| Portability | Moderate | High |
| Security | Strong isolation | Depends on container runtime |
| Management complexity | Higher (patching, OS updates) | Lower (especially with orchestration) |
Choose VMs when:
Choose containers when:
The reality in most DevOps workflows is that you’ll end up using both. Containers often run on top of VMs especially in cloud environments. For instance, Kubernetes clusters usually operate on VM-based nodes (like EC2 in AWS or Compute Engine in GCP). This layered architecture allows teams to enjoy the portability of containers while maintaining the control and isolation of VMs.
This hybrid model enables teams to:
Choosing between VMs and containers is not a matter of which is “better,” but rather which fits the job. VMs provide the flexibility, isolation, and compatibility necessary for legacy systems, compliance-heavy environments, and full-stack operating system control. Containers deliver speed, agility, and efficiency that are ideal for modern application development and deployment.
As a DevOps engineer, the key is to understand both tools, their strengths and limitations, and how to automate and orchestrate them effectively. The future isn’t about picking sides it’s about building systems that can leverage the best of both worlds.

In the ever-evolving landscape of software development, data is at the core of almost every application. Whether you’re building a simple web app, a large-scale enterprise platform, or a real-time analytics engine, your choice of database can significantly impact your application’s performance, scalability, and maintainability.
Traditionally, relational databases like MySQL, PostgreSQL, and Microsoft SQL Server have been the backbone of data storage in application architectures. These databases are time-tested, reliable, and built around a structured model of data using tables, rows, columns, and relationships. With SQL (Structured Query Language), developers can query complex relationships, enforce strict data integrity, and rely on ACID compliance to ensure transactional reliability. For decades, this model served a wide range of use cases across industries.
However, as applications began to scale rapidly particularly with the rise of the internet, mobile, and IoT a new set of challenges emerged. Relational databases, while powerful, began to show limitations in high-velocity, high-volume, globally distributed systems. Issues like vertical scaling limits, performance bottlenecks, and infrastructure complexity led developers to look for alternatives that offered more flexibility and elasticity.
Enter NoSQL databases a category of data stores designed to handle semi-structured or unstructured data, support horizontal scaling, and provide high availability with lower latency. Among these, AWS DynamoDB, Amazon’s fully managed NoSQL database service, has become a prominent choice for developers building modern, cloud-native applications. DynamoDB is known for its millisecond latency at scale, serverless architecture, and ability to handle millions of requests per second.
But DynamoDB isn’t just a “faster” or “more scalable” version of traditional SQL databases it’s fundamentally different in how it models, stores, and retrieves data. The shift from SQL to NoSQL requires a rethinking of data structures, access patterns, and even the way we design applications.
What makes DynamoDB unique is not just its performance, but the philosophical shift it represents in data design: from normalized schemas and relational joins to denormalized, access-pattern-based models.
For developers and teams coming from a relational background, adopting DynamoDB can feel unfamiliar even unintuitive at times. There are no joins, no complex aggregations, and no ad hoc queries in the traditional sense. Instead, you’re encouraged to think about how your application accesses data, and then model your data store to serve those access patterns efficiently.
It’s a different mindset, but one that pays off in terms of speed, cost efficiency, and scalability when used correctly.
On the flip side, traditional SQL databases still offer immense value, especially when your application depends on complex relationships, strong data integrity, and dynamic queries. They allow for more flexibility in querying, evolving data models, and are often easier to use during the early stages of development when access patterns aren’t fully known.
In this blog post, we’ll walk through the core differences between AWS DynamoDB and traditional SQL databases. We’ll look at how they differ in terms of data modeling, scalability, consistency, query capabilities, and cost structure.
Most importantly, we’ll discuss when to use each because understanding the strengths and limitations of both systems is key to choosing the right tool for your specific use case.
Whether you’re a developer evaluating DynamoDB for the first time, or a seasoned engineer looking to understand when to pick SQL vs NoSQL, this post will give you a clear, side-by-side comparison.
Let’s dive into the world of databases and uncover what makes DynamoDB and SQL so fundamentally different and when it makes sense to choose one over the other.

AWS DynamoDB is a fully managed, serverless NoSQL database service provided by Amazon Web Services. It’s designed to deliver fast and predictable performance at any scale, with seamless horizontal scalability, low-latency reads and writes, and automatic infrastructure management. DynamoDB is built to support applications that require consistent, single-digit millisecond response times regardless of the size of the dataset or the number of concurrent users.
At its core, DynamoDB is a key-value and document database. That means, unlike relational databases which rely on fixed schemas and relationships between tables, DynamoDB allows for flexible, schema-less design. Each item in a DynamoDB table is uniquely identified by a primary key, and you can store varying attributes (fields) across items without needing to predefine a strict structure.
DynamoDB tables can be configured with partition keys (or composite keys using a sort key), which determine how data is distributed across underlying storage nodes. This key-based access pattern enables efficient lookups and avoids the need for complex joins or full table scans two common performance bottlenecks in relational databases.
Because DynamoDB is serverless, there’s no need to provision or manage physical hardware, virtual machines, or database engines. AWS handles capacity planning, replication, patching, backup, and scaling automatically. You only pay for the capacity you use either through on-demand mode or provisioned throughput with optional auto-scaling.
DynamoDB also supports advanced features that enhance its versatility:
Security is also a key consideration. DynamoDB integrates with AWS Identity and Access Management (IAM) to provide fine-grained access control, and supports encryption at rest and in transit by default.
Another major strength of DynamoDB is its scalability. It can handle millions of requests per second and store petabytes of data without the need for manual sharding or clustering. The underlying infrastructure, inspired by Amazon’s internal systems (like the ones used by Amazon.com), ensures that performance remains consistent even under heavy load.
AWS DynamoDB is an ideal choice for applications that need:
It’s a cornerstone of modern, cloud-native application architecture especially for use cases like gaming, IoT, mobile backends, serverless APIs, and real-time analytics. But with great power comes a learning curve: DynamoDB requires careful planning of your access patterns and data structure to unlock its full potential.
Traditional SQL databases, also known as relational databases, are structured data management systems built around a well-defined schema using tables, rows, and columns. Examples include MySQL, PostgreSQL, Oracle Database, and Microsoft SQL Server all of which have been foundational in application development for decades.
These databases use Structured Query Language (SQL) as their primary interface for defining, manipulating, and querying data, making them highly expressive and powerful for handling complex queries and relationships.
At the heart of relational databases is the concept of normalization the practice of organizing data into separate but related tables to minimize redundancy and maintain data integrity.
These relationships are established through foreign keys, enabling developers to model complex real-world data structures like users and orders, products and categories, or students and courses. SQL databases shine in scenarios where data relationships are complex and querying across those relationships is essential.
One of their core strengths is ACID compliance ensuring Atomicity, Consistency, Isolation, and Durability of transactions. This means that even in the event of system failures or concurrent access, the database guarantees accurate, reliable outcomes. For applications that require strong consistency like banking, inventory systems, or HR platforms this reliability is a major advantage.
SQL databases also support ad hoc queries, aggregations, joins, and stored procedures, making them highly flexible for reporting, analytics, and dynamic querying. Developers can evolve their schema over time and accommodate a wide range of application needs without significant redesign.
In terms of scalability, most traditional SQL databases are optimized for vertical scaling, meaning performance is improved by upgrading the server (CPU, RAM, SSD). While some modern versions (like PostgreSQL or Aurora) offer limited horizontal scaling through read replicas or clustering, it’s generally more complex to scale a relational database horizontally compared to NoSQL systems.
That said, SQL databases remain a go-to solution for many applications due to their mature tooling, strong ecosystem, and developer familiarity. They work particularly well when you:
Despite the emergence of NoSQL databases, SQL databases are far from obsolete they continue to evolve and power critical systems worldwide.
| Feature | Traditional SQL | AWS DynamoDB |
|---|---|---|
| Data Model | Tables with rows and columns | Tables with items (key-value or document) |
| Schema | Fixed schema | Schema-less |
| Relationships | Supports JOINs, foreign keys | No joins; denormalized design |
| Scalability | Vertical scaling (mostly) | Horizontal scaling, auto-scaling |
| Performance | Optimized for complex queries | Optimized for high-throughput key-value access |
| Consistency | Strong ACID compliance | Eventually or strongly consistent (per request) |
| Query Language | SQL | DynamoDB API / PartiQL |
| Transactions | Full multi-row ACID transactions | Limited ACID support for multiple items (since 2018) |
| Hosting | Self-hosted or managed | Fully managed and serverless |
| Cost Model | Pay per compute/storage | Pay per read/write capacity units |


In today’s world, having an online presence isn’t just a luxury it’s a necessity. Whether you’re a developer, designer, freelancer, student, or small business owner, launching your own website is often the first step toward sharing your ideas, showcasing your work, or offering your services to a global audience.
But building a website is only half the battle hosting it affordably and reliably is the next big challenge. If you’re just starting out, you might be looking for a hosting solution that’s fast, secure, scalable, and ideally… free.
Enter Amazon Web Services (AWS) the most widely used cloud platform in the world. Trusted by startups and Fortune 500 companies alike, AWS offers a robust infrastructure that powers millions of websites and applications every day. But what many people don’t realize is that you don’t need a big budget to get started with AWS.
Thanks to the AWS Free Tier, you can deploy and run your own website on the same infrastructure used by tech giants without paying anything for the first 12 months (and in some cases, forever).
Yes, you read that right.
AWS Free Tier gives new users access to a generous set of cloud resources at zero cost. From hosting static websites on Amazon S3, to delivering them globally with Amazon CloudFront, and even adding HTTPS for secure connections using AWS Certificate Manager all of it can be done for free within certain usage limits.
This isn’t some stripped-down, limited demo. You’re working with production-grade tools that real companies use only you’re starting small, and free.
In this blog post, we’re going to walk you through exactly how to deploy your first website on AWS using only Free Tier services. You don’t need any cloud experience or coding knowledge beyond basic HTML/CSS we’ll guide you step-by-step from uploading your files to launching your site to the world.

You’ll learn how to:
index.html, CSS, JS, and images)Whether you’re building a personal portfolio, a product landing page, or just experimenting to learn cloud technologies, this guide is for you. It’s also a perfect starter project to boost your resume or GitHub profile especially if you’re pursuing a career in web development or cloud engineering.
By the end of this tutorial, you’ll not only have a live website running on AWS you’ll have hands-on experience with real cloud services, an understanding of how static website hosting works, and the confidence to go deeper into cloud development.
And the best part? You won’t spend a dime doing it.
So, let’s roll up our sleeves and launch your first website the AWS way, the Free Tier way.
S3 (Simple Storage Service) can be used to host static websites.
mywebsite.com)index.htmlerror.html (optional)Your bucket is now set to serve static files!
http://mywebsite.s3-website-us-east-1.amazonaws.com)CloudFront is AWS’s global CDN and it can cache your S3 website and provide free HTTPS (SSL) via ACM.
d123.cloudfront.net) with HTTPS If you have your own domain:
Now you have a custom domain + HTTPS + global CDN — all on Free Tier!
| Service | Free Tier Limit | Notes |
|---|---|---|
| S3 | 5GB storage + 15GB transfer | Always Free |
| CloudFront | 1TB data out + 10M requests | 12-month Free |
| Route 53 | Not free (domain costs $12/yr) | Optional |
| ACM (SSL) | Unlimited free public certs | Always Free |
With just a few clicks and a basic website, you can:
AWS might feel intimidating at first, but once you set it up, it’s a rock-solid platform for hosting personal projects, portfolios, landing pages, and more.

Deploying a website on AWS might sound intimidating at first but as you’ve seen, it’s completely possible to get your site online quickly, securely, and at zero cost using the AWS Free Tier. With just a few simple steps, you can take advantage of the same cloud infrastructure that powers global enterprises without touching your wallet.
By using Amazon S3, you’ve hosted your static files in a highly durable and scalable storage system. With CloudFront, you’ve boosted performance and added free HTTPS encryption for a professional, secure experience. And if you added Route 53 or a custom domain, you’ve taken the extra step to fully brand your online presence.
This isn’t just a website it’s your first hands-on experience with the cloud. You’ve learned how to:
Best of all, every part of this project can stay within the limits of AWS’s Free Tier giving you plenty of room to learn, experiment, and build more.
As you get more comfortable, you can continue expanding your site with contact forms (using AWS Lambda), visitor analytics, or even a backend API all with other Free Tier services available on AWS.
The cloud is no longer reserved for big companies or enterprise-level apps. It’s for creators, learners, builders and now, you.
So go ahead and share your site with the world. And when someone asks, “Where’s your website hosted?” you can confidently say: on AWS.

In today’s world of software development, version control has become an essential part of every project whether you’re building a massive enterprise system, a hobby app, or contributing to open-source.
At the heart of modern version control lies Git, a powerful and flexible distributed version control system (DVCS) that has transformed the way developers collaborate, manage codebases, and track changes.
However, as you start learning Git or working with teams, you’ll quickly encounter platforms like GitHub, GitLab, and Bitbucket, each with their own features, interfaces, and ecosystems.
This is where confusion often arises many newcomers assume Git and GitHub are interchangeable terms, or believe GitLab and Bitbucket are just alternatives to GitHub.
In reality, while Git is the underlying technology, GitHub, GitLab, and Bitbucket are platforms built on top of Git that offer enhanced features like hosting, collaboration tools, continuous integration (CI), project management, and DevOps pipelines.
Understanding the differences between them isn’t just a matter of vocabulary it can shape how your team collaborates, deploys, and maintains software.
Are you choosing the best platform for your workflow? Should you self-host your repositories or use a cloud service? Do you need robust CI/CD pipelines out of the box, or a tight integration with tools like Jira or VS Code? These are the questions that stem from this seemingly simple confusion.
This article aims to clear things up.
We’ll start by demystifying what Git actually is and why it remains the foundation of version control.
Then we’ll look at GitHub, GitLab, and Bitbucket breaking down what they offer, how they differ, and which one might be right for you or your team.
Whether you’re a solo developer curious about which platform to use, or part of a team evaluating enterprise options, this guide will help you understand the role each tool plays in modern development workflows.
By the end of this post, you’ll not only know the difference between Git and GitHub (yes, there’s a big one!) you’ll also be able to make smarter choices about which platform best suits your technical goals, collaboration needs, and DevOps strategy.
Let’s dive in and explore how Git forms the base layer, while platforms like GitHub, GitLab, and Bitbucket build upon it to offer rich ecosystems of tools that power today’s software projects.

Git is a distributed version control system (DVCS) used to track changes in source code during software development.
Created by Linus Torvalds in 2005, Git was designed for speed, reliability, and support for non-linear workflows.
Unlike centralized systems, Git allows every developer to have a full copy of the repository locally.
This makes operations like committing, branching, and merging fast and available offline.
Git is especially known for its powerful branching model, which lets developers experiment safely without affecting the main codebase.
Changes can be merged back in only when they’re ready, reducing risk and improving code quality.
With Git, collaboration becomes easier as multiple people can work on different parts of a project at the same time.
Its command-line interface gives developers fine-grained control, but many GUIs and IDEs offer Git integration too.
Git doesn’t host code it just manages it locally or remotely using services like GitHub or GitLab.
Understanding Git is the first step in mastering modern development workflows and version control.
Key features of Git:
Git is not a hosting service just a tool you use locally (unless connected to a remote).
GitHub is a cloud-based platform that hosts Git repositories and adds powerful collaboration tools on top.
It was launched in 2008 and is now owned by Microsoft, making it one of the most popular platforms for developers worldwide.
GitHub allows you to store code online, manage projects, track issues, and collaborate through pull requests and code reviews.
One of its standout features is GitHub Actions, which enables automated workflows like testing and deployment.
It also supports Markdown-based documentation, project boards, wikis, and Discussions for community engagement.
Public repositories are free and widely used for open-source projects, while private repos are also available at no cost.
GitHub integrates smoothly with tools like VS Code, making it easy to manage code from your editor.
It also offers social features like stars, forks, followers, and contributions, helping developers build portfolios.
While Git manages the code, GitHub provides the ecosystem for collaboration and continuous delivery.
In short, GitHub is where teams and individuals come together to build, review, and ship better code faster.
Popular for:
Free tier highlights:
GitLab is a web-based DevOps platform that provides Git repository hosting along with a full suite of CI/CD and project management tools.
Unlike GitHub, which started as a code hosting site, GitLab was built from the ground up with DevOps and automation in mind.
It offers features like issue tracking, merge requests, built-in CI/CD pipelines, container registry, and even infrastructure as code.
GitLab is available both as a cloud-hosted service and a self-hosted solution, making it a popular choice for companies that need more control.
Its free self-hosted Community Edition (CE) is open-source, while the Enterprise Edition (EE) includes advanced features for large teams.
The platform emphasizes an all-in-one approach code, CI/CD, security, and monitoring in a single UI.
Teams can automate their entire software lifecycle from planning to deployment without relying on external tools.
GitLab also includes powerful features for code review, role-based access, and release management.
It’s widely used by enterprises and DevOps teams that need tight integration across the development pipeline.
In short, GitLab is more than just Git hosting it’s a complete DevOps platform built for modern software delivery.
Unique points:
Bitbucket is a Git-based source code hosting platform developed by Atlassian, the company behind tools like Jira, Trello, and Confluence.
It allows teams to manage Git repositories with features like pull requests, inline code reviews, and branching strategies.
Bitbucket integrates tightly with the Atlassian ecosystem, making it ideal for teams already using Jira for project tracking.
It supports both cloud-hosted and self-managed deployments through Bitbucket Cloud and Bitbucket Data Center.
One of its key features is Bitbucket Pipelines, a built-in CI/CD tool for automating testing and deployments.
It emphasizes team collaboration and enterprise security, offering granular permissions and IP whitelisting.
While not as popular in the open-source community as GitHub, Bitbucket is widely used in enterprise and private team settings.
Developers can also take advantage of smart mirroring, branch permissions, and code insights.
Bitbucket originally supported Mercurial, but now focuses solely on Git-based repositories.
Bitbucket is a solid choice for professional teams, especially those already working within the Atlassian stack.
Best suited for:
CI/CD integration:
| Feature / Tool | Git | GitHub | GitLab | Bitbucket |
|---|---|---|---|---|
| Type | VCS tool | Git repo hosting | Git repo hosting + DevOps | Git repo hosting |
| Self-hosted option | N/A | Limited (via GitHub Enterprise) | Yes (GitLab CE/EE) | Yes (Bitbucket Server) |
| Built-in CI/CD | No | Yes (GitHub Actions) | Yes (GitLab CI/CD) | Yes (Pipelines) |
| Best for | Developers | Open source, collaboration | DevOps pipelines & automation | Jira-heavy teams |
| Parent Company | None | Microsoft | GitLab Inc. | Atlassian |
Use Git if:
Use GitHub if:
Use GitLab if:
Use Bitbucket if:


In the ever-evolving world of cloud computing, automation has become a cornerstone of modern infrastructure management. Organizations and developers alike are increasingly shifting away from manually provisioning cloud resources toward automated, repeatable, and version-controlled deployment processes.
One of the most powerful tools enabling this shift is AWS CloudFormation, Amazon Web Services’ native Infrastructure as Code (IaC) service. CloudFormation allows you to define, manage, and deploy AWS resources such as EC2 instances, S3 buckets, RDS databases, VPCs, and more all through human-readable template files written in YAML or JSON.
This approach not only increases deployment speed but also improves consistency, reduces human error, and enables infrastructure to be tracked and maintained like application code. Whether you’re managing a single development environment or orchestrating complex production systems, CloudFormation provides the control and scalability needed for reliable cloud infrastructure management.
For beginners, the thought of automating infrastructure might seem intimidating. However, CloudFormation simplifies this process by abstracting the underlying APIs and providing a declarative way to define what you want not how to do it.
This makes CloudFormation especially suitable for those just getting started with AWS or DevOps practices. With a single file, you can provision multiple resources, define relationships between them, and ensure configurations remain consistent over time.
Templates can be reused, shared, and versioned using tools like Git, making collaboration across teams smoother and more secure. Additionally, CloudFormation integrates seamlessly with other AWS services and DevOps pipelines, allowing infrastructure changes to be automated and tested alongside application code. It also supports rollback mechanisms and stack policies to help safeguard critical environments from unintended changes.
In this guide, we will walk through the process of deploying your first AWS resource using CloudFormation. We’ll focus on creating a simple yet meaningful resource: an Amazon S3 bucket. This foundational example will introduce you to the CloudFormation workflow from writing a YAML template to uploading it via the AWS Management Console and reviewing the stack’s progress.
Along the way, you’ll gain an understanding of key CloudFormation concepts such as stacks, templates, and resource declarations. Once deployed, you’ll also learn how to verify the resource in the AWS console and safely delete it afterward to avoid incurring unnecessary charges.
While this guide is centered on using the AWS web interface, the concepts you’ll learn can be easily applied to more advanced use cases involving the AWS CLI, CloudFormation macros, or integration with CI/CD pipelines.
By the end of this walkthrough, you’ll not only have created your first AWS resource using Infrastructure as Code, but also developed the foundational knowledge needed to start building more complex architectures programmatically. CloudFormation empowers you to think about your cloud environment as software structured, repeatable, and automated.
As cloud environments grow in complexity, mastering IaC tools like CloudFormation becomes an essential skill for developers, system administrators, DevOps engineers, and cloud architects alike. Embracing Infrastructure as Code isn’t just about convenience; it’s about adopting a best practice that aligns with modern software development and operational excellence.
Whether you’re deploying a single resource or an entire application stack, CloudFormation gives you the tools to do it efficiently, securely, and reliably. So, let’s dive into your first hands-on experience with CloudFormation and take the first step toward cloud infrastructure automation.

Let’s deploy an S3 bucket a simple, free-to-use AWS service that’s great for learning.
Create a file named s3-bucket.yaml:
AWSTemplateFormatVersion: '2010-09-09'
Description: Create an S3 bucket using CloudFormation

Resources:
  MyS3Bucket:
    Type: 'AWS::S3::Bucket'
    Properties:
BucketName: my-first-cloudformation-bucket-123456 # must be globally uniques3-bucket.yaml fileMyFirstStackGo to the S3 console and check for your new bucket under the name you specified.
To avoid charges:
CloudFormation will delete all resources in the stack.
You’ve deployed your first AWS resource using CloudFormation! This simple example shows the power of Infrastructure as Code where your infrastructure is documented, version-controlled, and repeatable.

Would you like help with a more advanced example or converting this to JSON or CLI usage?

In the modern digital era, where speed, efficiency, and agility define success, traditional software development and IT operations models often fall short. Businesses today demand faster release cycles, frequent updates, seamless scalability, and minimal downtime all while ensuring software quality and security.
These expectations have given rise to DevOps, a transformative cultural and technical approach that integrates software development (Dev) and IT operations (Ops) into a unified, collaborative workflow. DevOps is not just a collection of tools or processes it’s a mindset that encourages automation, continuous improvement, and cross-functional teamwork.
It breaks down silos between development and operations teams, enabling them to collaborate throughout the entire software lifecycle, from planning and coding to testing, releasing, deploying, and monitoring. By embracing DevOps, organizations can shift from lengthy release cycles and reactive troubleshooting to proactive planning, faster iterations, and more reliable delivery. At its core, DevOps promotes continuous integration and continuous delivery (CI/CD), allowing developers to integrate code into shared repositories frequently and automatically deploy tested code into production environments. This results in faster feedback loops, fewer errors, and a much more streamlined development pipeline.
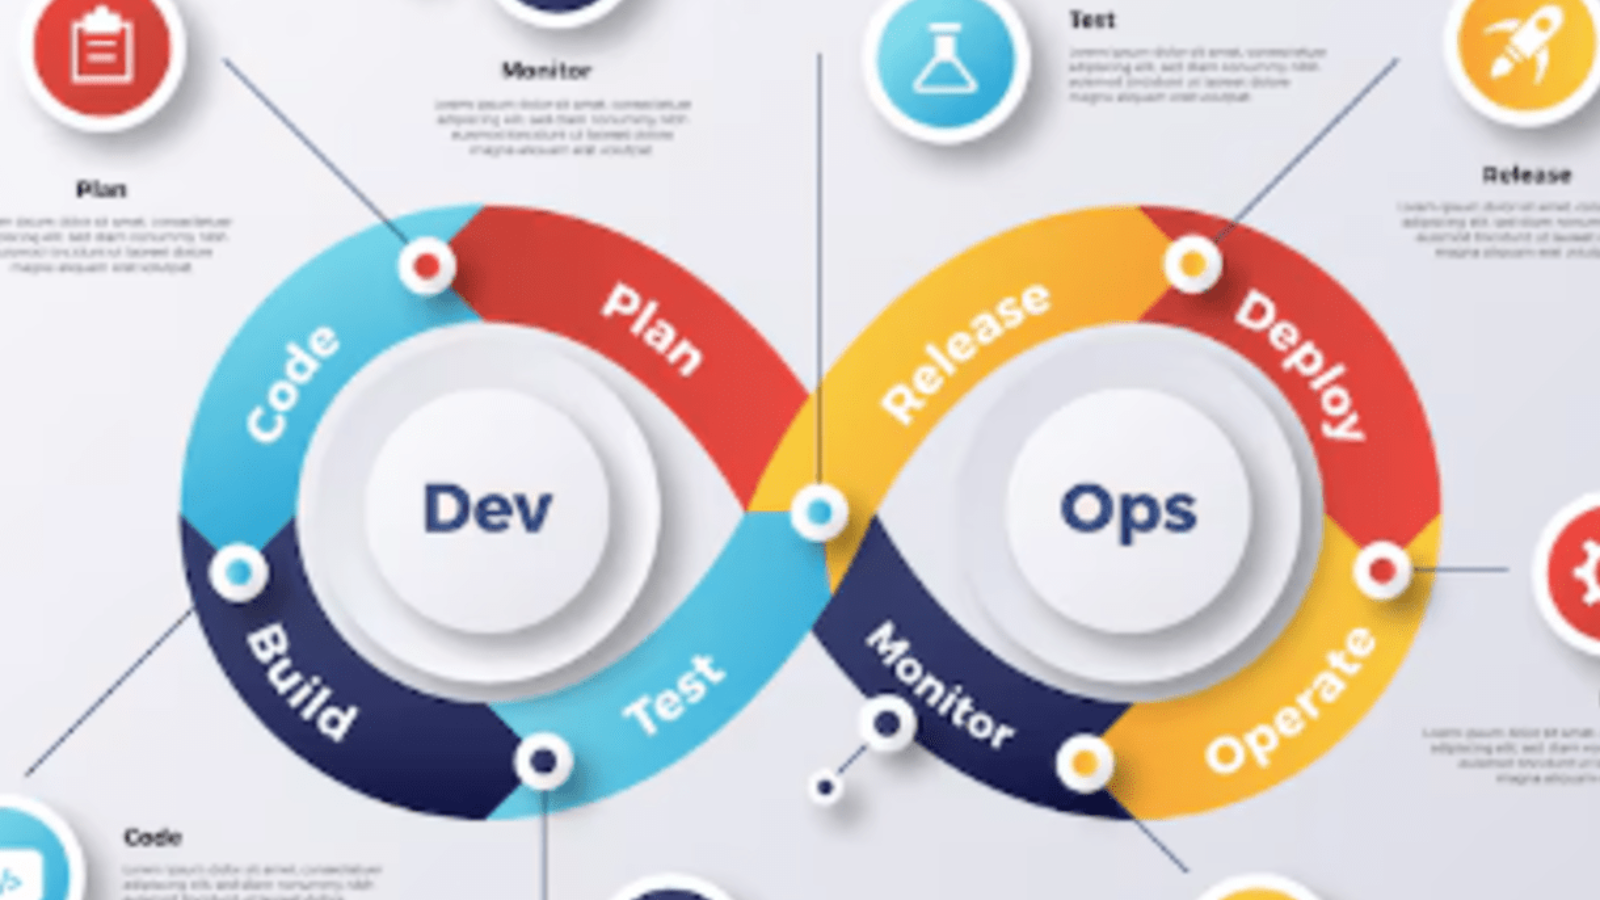
However, to truly benefit from DevOps, it’s essential to understand its full lifecycle each stage playing a critical role in delivering high-quality software efficiently. From initial planning and coding to testing, release, deployment, and operations, the DevOps lifecycle is designed as a continuous loop rather than a linear process, reinforcing the idea of ongoing improvement.
In addition to mastering the stages, businesses must adopt key best practices such as infrastructure as code, automated testing, and proactive monitoring. These practices not only improve system reliability and scalability but also reduce human error and enhance team productivity.
DevOps also fosters a culture of shared responsibility, where developers and operations professionals work together toward a common goal: delivering better software, faster. The impact of this approach is measurable shorter development cycles, higher deployment success rates, reduced failure recovery times, and improved customer satisfaction.
As digital transformation continues to accelerate across industries, adopting DevOps is no longer a competitive advantage it’s a necessity.
In this blog, we’ll explore the DevOps lifecycle in depth, examine the best practices that support it, and highlight the key benefits that make DevOps an essential part of any modern software development strategy.

DevOps is a set of practices and cultural philosophies that aim to unify software development (Dev) and IT operations (Ops). The goal is to shorten the development lifecycle, increase deployment frequency, and ensure reliable, high-quality releases.
At its core, DevOps emphasizes automation, continuous integration/continuous deployment (CI/CD), monitoring, and collaboration. It breaks down silos and encourages cross-functional teams to work together toward shared goals.
The DevOps lifecycle is a continuous loop made up of several interrelated phases. Here’s a breakdown of each stage:
The process starts with planning. Teams collaborate to define project goals, gather requirements, and create a roadmap. Agile methodologies, sprint planning, and backlog grooming are often used at this stage.
Developers write code using version control systems like Git. Code is often developed in small, manageable chunks to ensure it can be tested and integrated continuously. Peer reviews and static code analysis tools enhance code quality.
Code from multiple developers is compiled and built into deployable packages. Build automation tools like Jenkins, Maven, or Gradle are used to streamline this step.
Automated testing plays a critical role in DevOps. Unit, integration, performance, and security tests ensure the software works as intended before moving to production. Tools like Selenium, JUnit, and TestNG are commonly used.
After successful testing, the application is ready for deployment. Continuous delivery pipelines ensure that code is released quickly and safely to production environments.
Deployment is often automated using tools like Kubernetes, Ansible, or Docker. Rolling updates, canary deployments, and blue-green deployments help reduce risk during rollout.
This stage ensures the system runs smoothly in production. Monitoring tools like Prometheus, Datadog, or New Relic help track system health, performance, and availability.
Continuous monitoring and feedback loops allow teams to identify issues, gather user insights, and optimize future development efforts. It closes the DevOps loop and feeds back into planning.
To fully realize the benefits of DevOps, organizations should adopt the following best practices:
From builds and tests to deployments and infrastructure provisioning automation reduces errors and accelerates delivery.
Continuous Integration and Continuous Deployment ensure that code changes are automatically tested and released to production, increasing reliability.
Involve testing early in the development process to catch issues before they become costly in production.
Manage infrastructure through code using tools like Terraform or CloudFormation to ensure consistency across environments.
Break down silos between teams. Encourage transparency, shared responsibility, and open communication.
Use monitoring and logging to detect issues in real time, ensuring a proactive approach to incident management.
Adopting a DevOps approach delivers significant business and technical advantages:
Automated workflows and CI/CD pipelines enable faster and more frequent releases.
Development, QA, and operations teams work in sync, leading to better outcomes and fewer misunderstandings.
Automated testing, code reviews, and early issue detection lead to fewer bugs and better performance.
Automated deployments and consistent environments reduce downtime and manual effort.
With faster delivery and more reliable software, customers benefit from continuous improvements and quick issue resolution.
DevOps is not just a toolset it’s a mindset that requires cultural change, technical investment, and strong collaboration. By embracing the DevOps lifecycle and applying proven best practices, organizations can improve efficiency, reduce time to market, and build more resilient, scalable applications. Whether you’re just getting started or looking to refine your DevOps strategy, focusing on continuous improvement will keep your teams and your business on the path to success.

DevOps is far more than a trend it’s a critical evolution in how modern software is built, deployed, and managed. By unifying development and operations through a culture of collaboration, automation, and continuous improvement, DevOps empowers organizations to deliver better software faster and more reliably.
Each stage of the DevOps lifecycle plays a vital role in creating a seamless and responsive development pipeline, while best practices like CI/CD, automated testing, and infrastructure as code ensure quality and scalability at every step.
The benefits speak for themselves: shorter release cycles, higher deployment success rates, increased efficiency, reduced downtime, and improved customer satisfaction.
In a world where digital agility is key to staying competitive, adopting DevOps is no longer optional it’s essential. Whether you’re just starting your DevOps journey or looking to refine your approach, focusing on strong lifecycle management, cultural alignment, and automation will set your teams up for lasting success.
Now is the time to embrace DevOps not just as a toolset, but as a transformative strategy for building the future of your software and your business.

In today’s highly competitive and fast-paced digital landscape, businesses are constantly looking for smarter, more efficient ways to operate, scale, and innovate. Technology has become the backbone of modern enterprises, and among the most transformative innovations of recent years is cloud computing.
What once required expensive hardware, dedicated IT teams, and complex infrastructure can now be handled seamlessly in the cloud with greater speed, flexibility, and security. Cloud computing allows organizations to access computing power, data storage, and software solutions over the internet, rather than relying solely on on-premise servers.
This shift has fundamentally changed the way businesses operate, enabling greater agility, enhanced collaboration, and significant cost savings. As remote work, global operations, and digital customer experiences become the norm, the cloud has emerged as a critical enabler of modern business strategy. From small startups to multinational corporations, cloud computing provides a level playing field where innovation is accessible and scalable.
It eliminates the need for massive upfront capital investment, making cutting-edge technologies available to organizations that previously couldn’t afford them. More importantly, it empowers businesses to respond quickly to changes in the market, customer expectations, and internal demand. Whether it’s launching new applications, expanding into new regions, or ensuring business continuity during disruptions, cloud-based solutions offer the speed and flexibility necessary to stay competitive.
With features like automatic software updates, built-in disaster recovery, and robust data security, companies can focus more on growth and innovation and less on infrastructure management. Moreover, as cybersecurity threats evolve and compliance requirements tighten, leading cloud providers are investing billions into safeguarding client data often exceeding what individual companies can achieve on their own.
The ability to collaborate in real-time, from anywhere in the world, is another compelling reason why businesses are adopting cloud platforms at an accelerating pace. As more workflows, processes, and customer interactions move online, cloud computing makes it easier to connect teams, streamline operations, and gather data-driven insights.
It’s not just a trend it’s a technological foundation for the future. Whether you’re considering migrating a few applications or moving your entire infrastructure, understanding the value cloud computing offers is essential. In this blog post, we’ll take a closer look at the top five benefits of cloud computing for businesses and how they can drive efficiency, innovation, and sustainable growth.

One of the biggest advantages of cloud computing is its cost-saving potential. Traditional IT setups often require substantial upfront investment in servers, hardware, and maintenance. With the cloud, those costs disappear.
You only pay for what you use like a utility bill. This pay-as-you-go model allows businesses to scale their IT expenses in line with actual needs, avoiding overprovisioning or underutilization. Plus, no more worrying about the cost of upgrades or repairs your cloud provider takes care of it.
Need to add storage or processing power overnight? With cloud services, it’s as simple as clicking a button.
Cloud computing allows businesses to scale resources up or down instantly. Whether you’re launching a new product, experiencing seasonal spikes, or entering new markets, the cloud adjusts to your needs without requiring major infrastructure changes. This flexibility is especially beneficial for startups and growing businesses that need to stay agile.
Cloud platforms make it easier than ever for teams to collaborate in real time, no matter where they’re located. With tools like Google Workspace, Microsoft 365, and other cloud-based project management systems, employees can co-edit documents, share files securely, and communicate seamlessly.
As remote and hybrid work become the norm, cloud computing enables 24/7 access to data and applications, keeping your business running from anywhere.
Security remains a top concern for any business but the cloud can help you sleep better at night.
Leading cloud providers invest heavily in state-of-the-art security, including data encryption, multi-factor authentication, and constant monitoring. Additionally, built-in backup and disaster recovery solutions ensure your data is protected even in the face of hardware failures, natural disasters, or cyberattacks.
Many providers also offer compliance with industry standards (like GDPR, HIPAA, or ISO) to help you meet regulatory requirements.
Staying up to date with the latest software and technology can be time-consuming and expensive. With cloud computing, automatic updates ensure your systems are always running the latest versions without manual intervention.
Even better, cloud platforms give businesses easy access to cutting-edge tools like AI, machine learning, data analytics, and more without needing in-house expertise or expensive infrastructure.
Cloud computing is more than just a trend it’s a strategic asset for businesses aiming to grow, innovate, and stay secure in a digital-first world. Whether you’re looking to cut costs, empower your remote team, or scale effortlessly, the cloud has a solution.
Ready to take your business to the cloud? It might be the smartest move you make this year.

Cloud computing is no longer just a technological upgrade it’s a strategic advantage that empowers businesses to thrive in a digital-first world. From reducing operational costs to enhancing collaboration, from providing unmatched scalability to ensuring robust data security, the cloud is transforming how companies operate, compete, and grow.
As the business environment becomes more dynamic and customer expectations continue to evolve, the ability to adapt quickly is crucial. Cloud computing gives you the tools, flexibility, and resilience to meet those challenges head-on.
Whether you’re a startup looking to scale or an established enterprise aiming to optimize your operations, embracing cloud technology can unlock new levels of productivity and innovation. The benefits are clear, the opportunities are vast, and the time to take action is now. By moving to the cloud, your business isn’t just keeping up it’s moving ahead.
