Introduction.
In the world of cloud computing, performance optimization is key—especially when it comes to deploying large-scale or latency-sensitive applications. Whether you’re running high-performance computing (HPC) workloads, distributed databases, or gaming servers, the physical placement of your EC2 instances can have a significant impact on speed, reliability, and cost-efficiency. That’s where AWS Placement Groups come into play. Designed to give users more control over how instances are physically distributed across AWS’s data center infrastructure, Placement Groups allow you to tailor your architecture based on your performance, redundancy, and scalability requirements. AWS offers three main placement strategies: Cluster, Spread, and Partition. Each serves a unique purpose. The Cluster strategy packs instances close together within a single Availability Zone to reduce latency and improve throughput. The Spread strategy distributes instances across distinct underlying hardware, reducing the risk of simultaneous failures. Meanwhile, the Partition strategy is ideal for massive, fault-tolerant distributed systems by placing instances into logical partitions with isolation at the hardware level. While Placement Groups may seem like an advanced AWS feature, they’re surprisingly easy to set up once you understand the use cases and options. This guide will walk you through everything from choosing the right strategy to deploying your first group via the AWS Management Console, CLI, and Terraform. You’ll also learn about best practices, limitations, and common pitfalls to avoid. Whether you’re a cloud architect, DevOps engineer, or just starting your AWS journey, mastering Placement Groups can help you build systems that are faster, more resilient, and better aligned with your business needs. So, if you’re ready to squeeze more power out of your EC2 infrastructure, let’s dive in and explore how AWS Placement Groups can elevate your cloud strategy.

1. Using AWS Management Console
Step-by-step:
- Go to the EC2 Dashboard in the AWS Console.
- In the left-hand menu, click on “Placement Groups” under “Instances”.
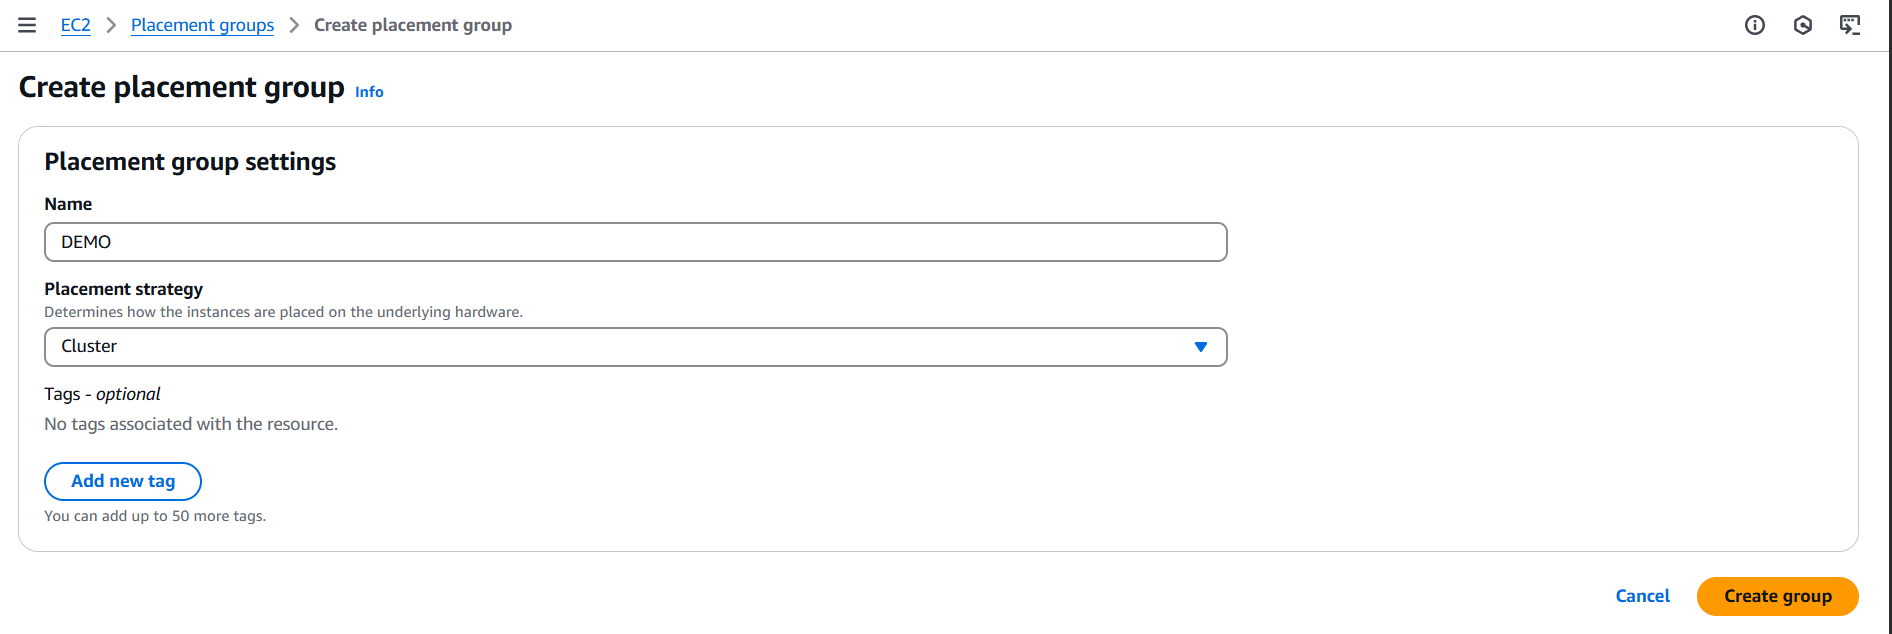
- Click “Create placement group”.
- Configure the group:
- Name: Give your placement group a name.
- Strategy:
Cluster: Packs instances close together (low latency, high throughput).Partition: Spreads instances across partitions (good for large distributed systems like Hadoop).Spread: Places instances on distinct hardware (max 7 per AZ).
- Network: Choose default or placement group-specific VPC.
- Click “Create group”.


2. Using AWS CLI
First, make sure the AWS CLI is installed and configured.
Command to create:
aws ec2 create-placement-group \
  --group-name my-placement-group \
  --strategy cluster
You can also use spread or partition for the --strategy.
To list all placement groups:
aws ec2 describe-placement-groups3. Using Terraform
Here’s a quick Terraform snippet:
resource "aws_placement_group" "example" {
  name     = "example-pg"
  strategy = "cluster"
}
terraform init
terraform apply
Conclusion.
In today’s fast-paced digital landscape, building performant and resilient cloud infrastructure isn’t just a bonus—it’s a necessity. AWS Placement Groups offer a powerful yet underutilized feature that enables you to fine-tune the physical deployment of your EC2 instances to match your workload requirements. Whether you need ultra-low latency for high-performance computing, high availability across hardware for mission-critical apps, or robust fault isolation for big data clusters, there’s a placement strategy designed for your use case. By understanding the differences between Cluster, Spread, and Partition strategies, you can make smarter decisions about how to structure your resources for performance and durability. As we’ve seen, setting up a placement group is straightforward via the AWS Management Console, CLI, or Terraform—making it accessible whether you’re managing infrastructure manually or using Infrastructure as Code. But more than just the setup, it’s important to integrate placement groups into your broader architectural thinking. Consider how instance types, AZ selection, scaling needs, and fault domains interact with your placement strategy. And always monitor and test performance to validate your design choices. In essence, placement groups are like a fine-tuning dial for your AWS EC2 environment. Use them wisely, and you can dramatically improve your app’s responsiveness, uptime, and fault tolerance. So whether you’re optimizing for throughput, resilience, or distribution, now you have the tools and knowledge to put AWS Placement Groups to work. Start experimenting, measure the results, and elevate your cloud architecture to the next level.

Add a Comment